Featured Content
Using HTML Buttons in Power BI - Step-by-Step Guide
Learn how to enhance your Power BI reports with custom HTML buttons for improved interactivity and design
Take your Power BI report design to the next level with HTML buttons. By incorporating custom HTML buttons, you can create visually appealing and interactive reports that stand out. Follow these steps to integrate HTML buttons into your reports seamlessly.
1. Edit Your Button Code in an IDE
The best way to create and test your HTML buttons for Power BI is to write and edit the code in an Integrated Development Environment (IDE) like Visual Studio Code or CodePen. CodePen is a convenient online platform for quick prototyping and is the suggested method for ease of use.
Important: HTML buttons in Power BI cannot include JavaScript for security and functionality reasons.
How to Get the Code
There are several approaches to obtain HTML button code:
1. Self-Writing
Write your HTML button code manually. This method allows you to have complete control over the design and functionality of your buttons, enabling precise customization.
2. Getting Samples from CodePen
Explore platforms like CodePen to find sample HTML button codes. Effective search terms to use include:
- “HTML button”
- “CSS button styles”
- “custom button”
- “responsive button design”
You can use these samples as a starting point and modify them to suit your needs.
3. Using ChatGPT
Leverage ChatGPT to generate HTML button code based on your requirements. Describe the design and functionality you need, and ChatGPT can provide the corresponding code.
Effective ChatGPT Prompt Template
Here’s an effective prompt to use with ChatGPT:
Chat, please help me create an HTML button; consider the following indications:

- There should be three buttons: Finance, Operation and HR.
- The button(s) should be modern and nice-looking, with an icon from Material Design.
- The button should include hover and press states.
- Use single quotes (') instead of double (") and add the CSS in a style tag in the head.
- Remove all body padding and margins.
- Centre the button horizontally and vertically in the body.
- The button should have a href as action on a new page.
- Please include this CSS:

body {
    margin: 0;
    padding: 0;
    display: flex;
    justify-content: center;
    align-items: center;
    height: 100vh;
}
.container {
    display: flex;
    flex-wrap: wrap;
    justify-content: space-between;
    gap: 20px;
}
Using these methods, you can efficiently create HTML buttons that meet your specific needs and preferences.
2. Get an HTML Visual for Power BI
To display HTML buttons in Power BI, you must use a visual that supports HTML content. Several custom visuals are available that can render HTML code. Any of these visuals allows you to embed and display HTML directly within your Power BI reports, enabling interactive buttons and other HTML elements to enhance your data presentations.
Available HTML Visuals
| Visual Name | Certified | Print PDF/PPT | Access External Resources | Free |
|---|---|---|---|---|
| HTML Content (lite) | ✔ | ✔ | ✔ | |
| Shielded HTML Viewer | ✔ | ✔ | ||
| HTML VizCreator Cert | ✔ | ✔ | ||
| HTML Content | ✔ | ✔ | ||
| ParaHTMLViewer | ✔ | ✔ | ||
| HTML VizCreator Flex | ✔ |
Key Considerations
When choosing an HTML visual, you need to consider two important functionalities:
Print to PDF/PPT: Power BI lets you export reports to PDF and PowerPoint; this feature is only available for default and certified custom visuals.
Access External Resources: Certified visuals in Power BI cannot access external resources. Therefore, you cannot use external stylesheets. This means you are limited on supporting design tools, and all styling and functionality must be contained within the HTML code embedded in the visual.
Installation Steps
Follow these quick steps to add a custom visual from the store:
- Open Power BI Desktop
- Import Custom Visuals from the Store:
- Click on the Visualizations pane
- Click the three dots (…) and select “Get more visuals”
- Choose the Custom Visual:
- Browse the store to find the visual you want
- Click “Add” to import the visual into Power BI
- Add and Configure:
- Click the new visual icon in the Visualizations pane to add it to your report
- Drag fields to the visual’s configuration areas
- Use the Format pane to customize the appearance
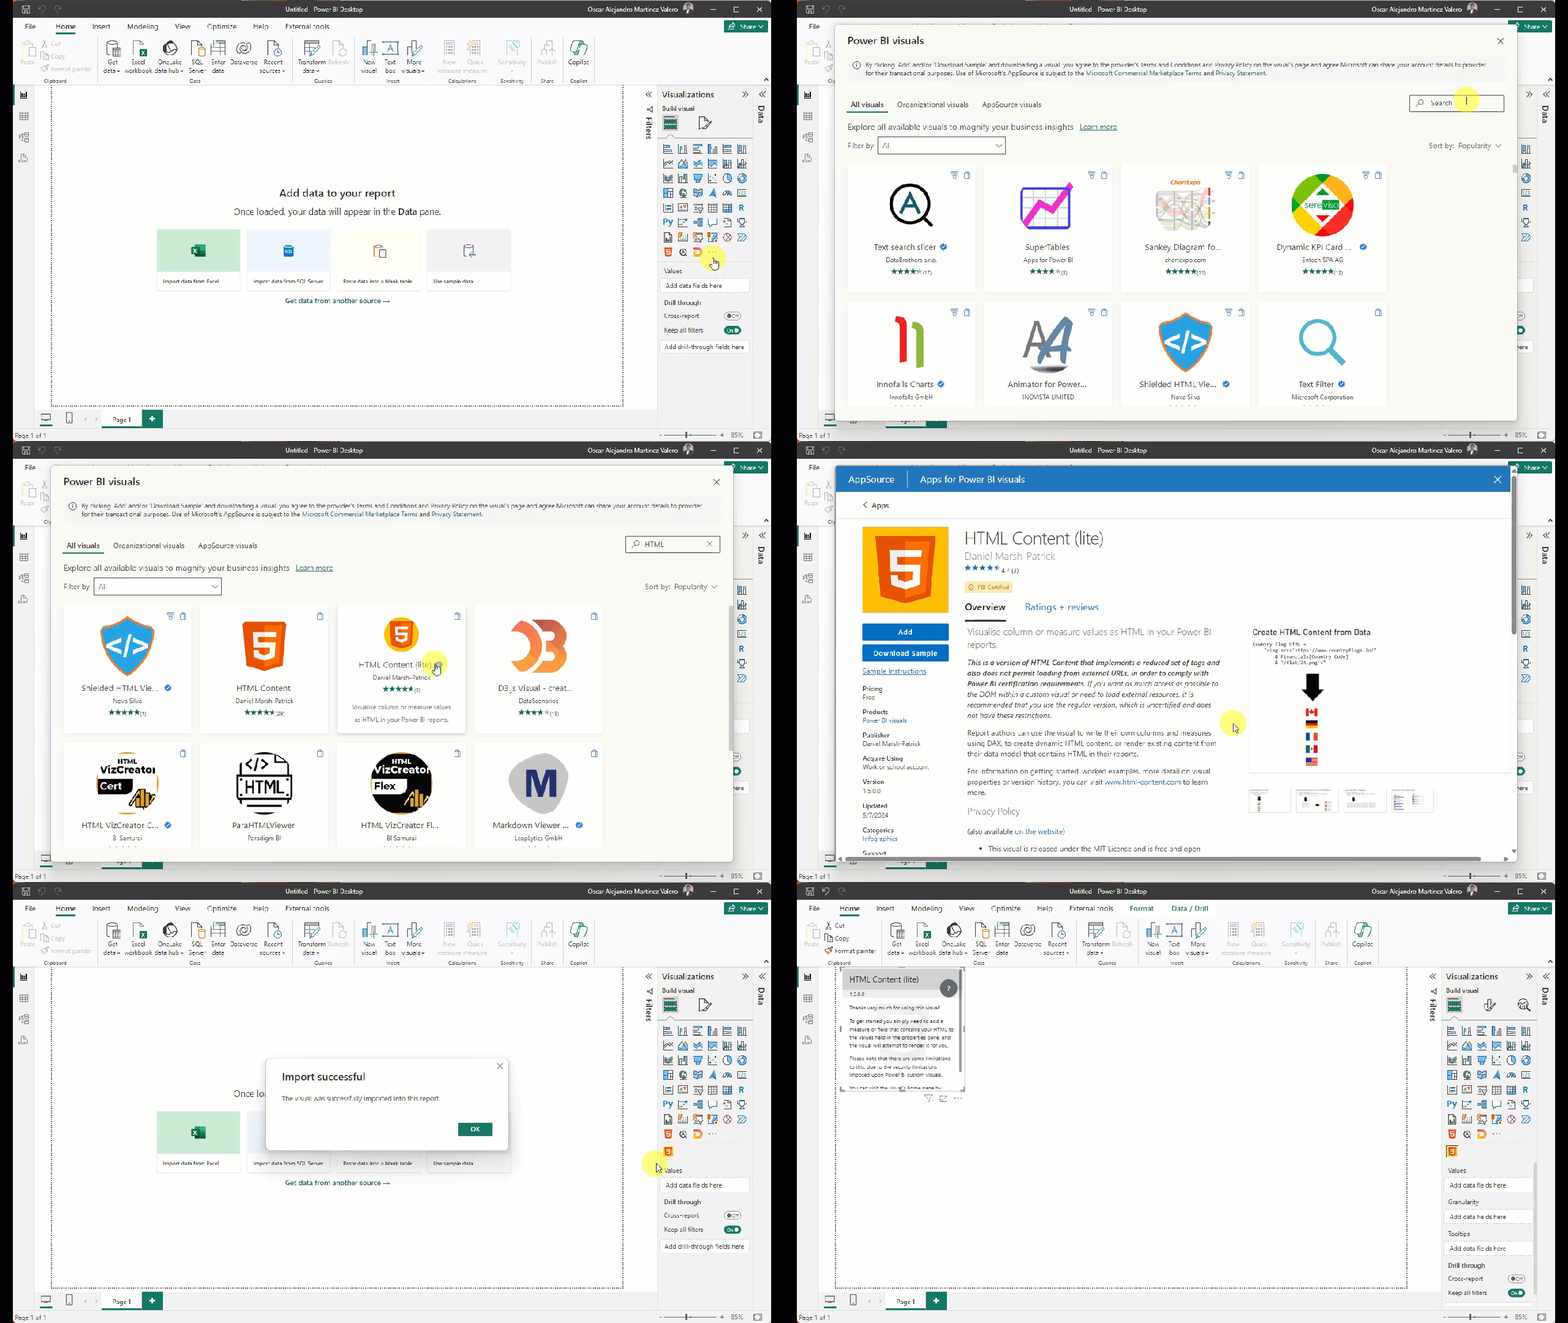 Adding an HTML custom visual in Power BI
3. Create Measures to Store HTML Code
Store your HTML button code as text within Power BI measures. You can also use DAX expressions to generate HTML code dynamically based on report data.
Important: When embedding HTML code in DAX, use single quotes only. Double quotes can cause DAX errors.
Sample HTML Button Code
Here’s a complete example of HTML button code stored in a DAX measure:
HTML Button = "<!DOCTYPE html>
<html lang='en'>
<head>
    <meta charset='UTF-8'>
    <meta name='viewport' content='width=device-width, initial-scale=1.0'>
    <title>Modern Buttons</title>
    <style>
        @import url('https://fonts.googleapis.com/icon?family=Material+Icons');
        body {
            margin: 0;
            padding: 0;
            display: flex;
            justify-content: center;
            align-items: center;
            height: 100vh;
            background-color: #f0f0f0;
        }
        .container {
            display: flex;
            flex-wrap: wrap;
            justify-content: space-between;
            gap: 20px;
        }
        .btn {
            display: flex;
            align-items: center;
            padding: 10px 20px;
            border: none;
            border-radius: 5px;
            text-decoration: none;
            font-size: 16px;
            font-family: 'Arial', sans-serif;
            color: white;
            background-color: #6200ea;
            transition: background-color 0.3s, transform 0.1s;
        }
        .btn .material-icons {
            margin-right: 8px;
        }
        .btn:hover {
            background-color: #3700b3;
        }
        .btn:active {
            transform: scale(0.95);
        }
    </style>
</head>
<body>
    <div class='container'>
        <a href='finance.html' class='btn'>
            <span class='material-icons'>account_balance</span>Finance
        </a>
        <a href='operation.html' class='btn'>
            <span class='material-icons'>build</span>Operation
        </a>
        <a href='hr.html' class='btn'>
            <span class='material-icons'>people</span>HR
        </a>
    </div>
</body>
</html>"
4. Considerations and Use Cases
While HTML buttons can greatly enhance the design of your Power BI reports, there are some important limitations to consider:
Limitations
No In-Page Navigation: HTML buttons cannot be used for in-page navigation within the Power BI report. They can only be used to navigate to external URLs.
Limited Interactivity: Due to the restriction on JavaScript, the interactivity of HTML buttons is limited compared to native Power BI buttons.
Use Cases for HTML Buttons
Despite these limitations, HTML buttons can be effectively used for several purposes:
- Navigating to Different Reports: Use HTML buttons to link to other Power BI reports or dashboards
- External Links: Create buttons that direct users to external websites or resources
- Starting a Team Chat: Use buttons to initiate a chat in Microsoft Teams
- Sending Emails: Design buttons that open the default email client with a predefined email address
5. Practical Examples
Here are practical sample HTML button codes you can use in your Power BI reports.
Teams Chat Button Code
Starting a Teams Chat
You can create a deep link for starting a chat using the following format:
https://teams.microsoft.com/l/chat/0/0?tenantId=<tenantId>&users=<user1>,<user2>,...&topicName=<chat name>&message=<precanned text>
Query Parameters:
users: A comma-separated list of user IDs representing the chat participants. The user initiating the action is always included. This parameter supports the Microsoft Entra UserPrincipalName, such as an email address.
topicName: An optional parameter for the chat’s display name if there are three or more participants. If not specified, the display name defaults to the names of the participants.
message: An optional parameter for the message text to be pre-filled in the compose box of the current app user while the chat is in draft state.
Open Teams Chat = "<!DOCTYPE html>
<html lang='en'>
<head>
    <meta charset='UTF-8'>
    <meta name='viewport' content='width=device-width, initial-scale=1.0'>
    <title>Modern Buttons</title>
    <style>
        @import url('https://fonts.googleapis.com/icon?family=Material+Icons');
        body {
            margin: 0;
            padding: 0;
            display: flex;
            justify-content: center;
            align-items: center;
            height: 100vh;
        }
        .container {
            display: flex;
            flex-wrap: wrap;
            justify-content: space-between;
            align-items: center;
            gap: 20px;
            height: 100vh;
            width: 100%;
        }
        .btn {
            display: flex;
            align-items: center;
            padding: 10px 20px;
            border: none;
            border-radius: 5px;
            text-decoration: none;
            font-size: 16px;
            font-family: 'Arial', sans-serif;
            color: white;
            background-color: #6200ea;
            transition: background-color 0.3s, transform 0.1s;
        }
        .btn .material-icons {
            margin-right: 8px;
        }
        .btn:hover {
            background-color: #3700b3;
        }
        .btn:active {
            transform: scale(0.95);
        }
    </style>
</head>
<body>
    <div class='container'>
        <a href='https://teams.microsoft.com/l/chat/0/0?users=joe@contoso.com,bob@contoso.com&topicName=Prep%20For%20Meeting%20Tomorrow&message=Hi%20folks%2C%20kicking%20off%20a%20chat%20about%20our%20meeting%20tomorrow' class='btn'>
            <span class='material-icons'>chat</span>Start Teams Chat
        </a>
    </div>
</body>
</html>"
Email Button
Sending an Email
Similar to the Teams chat action, you can add a deep link to compose an email in the HTML code’s HREF.
https://outlook.office.com/mail/deeplink/compose?to=service@domain.com&subject=Customer+Service+Request&body=Add+Your+Request+here
Query Parameters:
subject: Email’s subject
body: An optional parameter for the body of the email
to: An optional parameter for the recipient of the message
Send email = "<!DOCTYPE html>
<html lang='en'>
<head>
    <meta charset='UTF-8'>
    <meta name='viewport' content='width=device-width, initial-scale=1.0'>
    <title>Modern Buttons</title>
    <style>
        @import url('https://fonts.googleapis.com/icon?family=Material+Icons');
        body {
            margin: 0;
            padding: 0;
            display: flex;
            justify-content: center;
            align-items: center;
            height: 100vh;
        }
        .container {
            display: flex;
            flex-wrap: wrap;
            justify-content: space-between;
            align-items: center;
            gap: 20px;
            height: 100vh;
            width: 100%;
        }
        .btn {
            display: flex;
            align-items: center;
            padding: 10px 20px;
            border: none;
            border-radius: 5px;
            text-decoration: none;
            font-size: 16px;
            font-family: 'Arial', sans-serif;
            color: white;
            background-color: #6200ea;
            transition: background-color 0.3s, transform 0.1s;
        }
        .btn .material-icons {
            margin-right: 8px;
        }
        .btn:hover {
            background-color: #3700b3;
        }
        .btn:active {
            transform: scale(0.95);
        }
    </style>
</head>
<body>
    <div class='container'>
        <a href='mailto:contact@bibb.pro' class='btn'>
            <span class='material-icons'>mail</span>Send mail
        </a>
    </div>
</body>
</html>"
Conclusion
Following these guidelines, you can enhance the visual appeal and functionality of your Power BI reports with HTML buttons. These custom buttons provide a way to create more engaging and interactive reports that can connect to external resources and applications.
Remember to consider the limitations of HTML visuals in Power BI, particularly around security restrictions and the inability to use JavaScript. However, with creative use of CSS and proper planning, you can create compelling button interfaces that significantly improve your report’s user experience.
Feel free to reach out if you have any questions or need further assistance in creating your HTML buttons for Power BI!





Comments
Share your take or ask a question below.